Intelligent Workflow Runner and WorkflowXML Designer with Automation API
Contents
Intelligent Workflow Runner and WorkflowXML Designer with Automation API
Creating custom job item (C#):
Integrating into WorkflowXMLDesigner:
Debugging your custom job item designer
Debugging your custom job item
Introduction
Intelligent Workflow Runner is a high availability API for long running CSDK applications with scale-up capability using declarative programming method. Intelligent Workflow Runner is implemented as an out-proc COM object. It can be used in a standard way from .NET or native/Win32 or any other programming environment that can work with COM objects. This API ensures the high availability and the safety of your application. No resource leaks, hangs, or crashes are manifested.
Workflows are manifested in XML files.
These XML files can contain one or more JobItem(s). Multiple JobItems can be sequenced
(dependent) or parallel.
There are predefined JobItems implemented by the CSDK and you can create your
custom JobItem using C++ or .NET.
WorkflowXMLs can be created (by the Designer) as predefined workflows, changing
(by your app) only the input/output filenames or your application can construct
them programmatically. The Designer is a good starting point. WorkflowXMLs are
executed by Intelligent Workflow Runner (OCRService).
IWR is implemented in OCRService.exe / OCRServer.exe out-of-process COM server pair.
They must be registered by OCRServer /regserver and OCRService /regserver at admin
command prompt or by the Installer. By default, in this case the Interactive
user will run the two COM servers. You can register IWR as a service using the /service switch. In this case, the
system account will run the processes.
IWR has a very simple program interface. It is just about
the WorkflowXML execution and management. There is no any CSDK-API dependency.
The Run()
method of the interface is asynchronous one. The Apps get the execution results
in the done event.
OCRService part of the IWR is also responsible for scaling-up. It handles
multiple OCRServers (CSDK process). The application can control the number of
the workers. By default, OCRService starts as many workers as virtual CPUs are
available.
The OCRService part is also responsible for the OCRServer process life cycle
management to achieve 24x7 operation. OCRServer is the host of CSDK binaries.
OCRService can be hosted in a Windows Service. You can operate multiple nodes
with OCRService to implement an application with scale-out capabilities. In
this model, you need to distribute WorkflowXMLs to the OCRService nodes using
queues, for instance ServiceBus.
The Designer
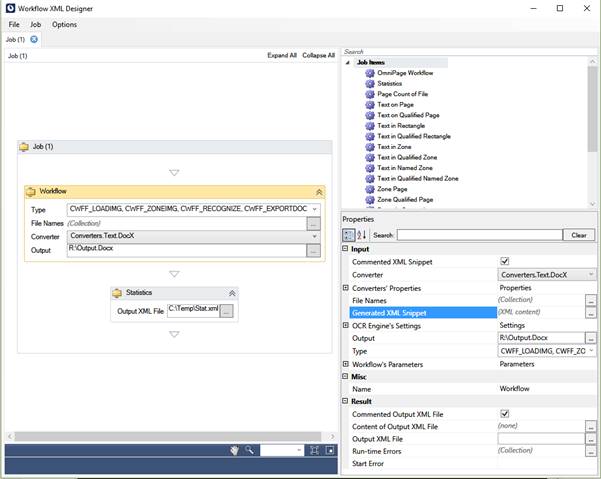
The Workflow XML Designer (manifested by WorkflowXMLDesigner.exe) is the tool where engineers can create and test workflows for CSDK IWR engine. IWR workflows can be saved into WorkflowXML files. Input and output file names can be templated.
The main screen of the Designer with a simple (OmniPage 123 like) workflow is displayed below. The actual workflow is on the left side. The predefined and custom JobItems are located on the right. All the input and output filenames can be templated. (The application can easily replace the $inputfile1$ string to the actual full path).
Note: The first startup of the designer can take some time.
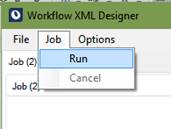
You can test the workflow on the Job tab by selecting Run command:
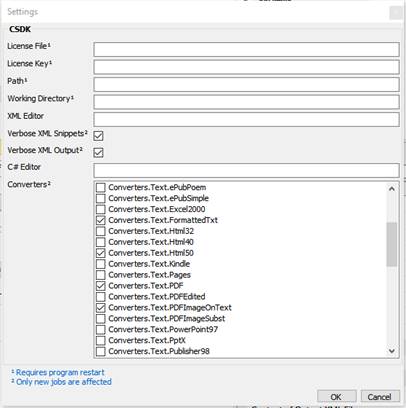
You can extend the available output document formats by selecting Options > Setting…:
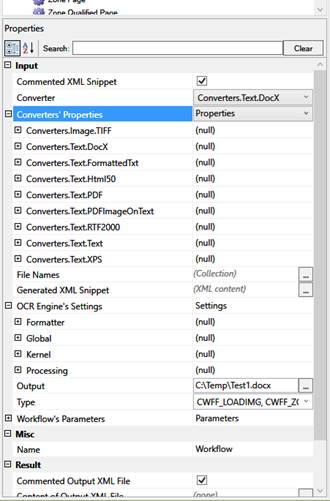
You can set or change all CSDK settings and Workflow parameters in the JobItem Properties window:
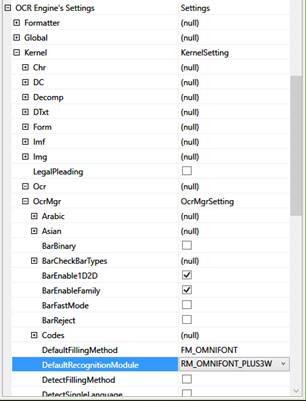
The image below describes a CSDK settings sample, the OCR Engine’s Settings:
Amongst others, the following Workflow parameters can be configured:
If you are ready with your workflow, you can save it for later editing, or export it into WorkflowXML file.
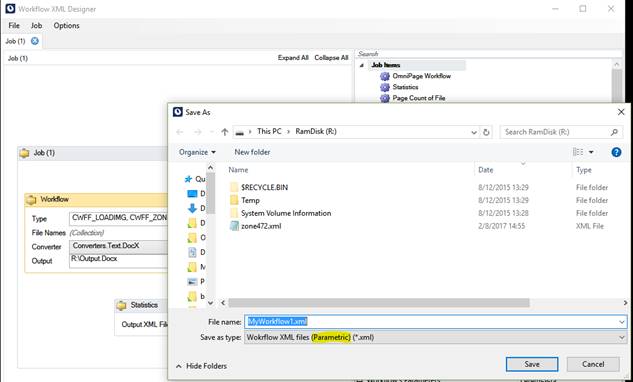
This is the WorkflowXML file (templated version) of this simple workflow:
<?xml version="1.0" encoding="utf-8"?>
<!--This xml will be sent to OCRService.-->
<!--The xml is case sensitive.-->
<!--"type" attibutes determine the interpretation of "value" attributes.-->
<!--If "type" is an exported enum, then symbolic values can be applied.-->
<OCRJob>
<!--clsid: identifies "Workflow" job item type.-->
<!--id: the runtime identifier of this job item instance.-->
<!--This job item will be started immediately.-->
<!--"Workflow" job item executes a standard OmniPage workflow.-->
<!--The number of the available steps is limited.-->
<JobItem clsid="{14ABDDC9-0DF7-4D1C-9687-0AE5F2AD1C3D}" id="{fb1e57a3-7c6f-4bca-88b3-b2b979db116e}">
<!--Definition of the steps in the workflow.-->
<Type type="integer" value="IWFT_WFS_DIRECT|CWFF_LOADIMG| CWFF_ZONEIMG| CWFF_RECOGNIZE| CWFF_EXPORTDOC" />
<!--Definition of the input files.-->
<!--Input files are always passed in an array.-->
<Inputs type="array">
<Input type="string" value="$inputfile1$" />
</Inputs>
<!--Definition of the Document's settings.-->
<!--Each setting is defined with "settingname", "type" and "value".-->
<!--For details see the CSDK documentation.-->
<Settings>
<!--Set 'Kernel.OcrMgr.DefaultRecognitionModule' setting.-->
<Setting settingname="Kernel.OcrMgr.DefaultRecognitionModule" type="integer" value="RM_OMNIFONT_PLUS3W" />
</Settings>
<!--Definition of the output file.-->
<Output type="string" value="$outputfile1$" />
<!--Definition of the converter used to generate output.-->
<Converter value="Converters.Text.DocX" />
<!--This job item will NOT generate response XML!-->
</JobItem>
<!--clsid: identifies "Statistics" job item type.-->
<!--id: the runtime identifier of this job item instance.-->
<!--dependency: this job item will be started when the job item having id="{fb1e57a3-7c6f-4bca-88b3-b2b979db116e}" finished.-->
<!--"Statistics" job item returns the statistics of the document.-->
<!--For details see Nuance.OmniPage.CSDK.IproPlus.Document.GetStatistics.-->
<JobItem clsid="{69490304-CC87-476C-90C3-58B200F6303F}" id="{9dedf984-4ec9-400a-9f29-299deb8123c5}" dependency="{fb1e57a3-7c6f-4bca-88b3-b2b979db116e}">
<!--Definition of the response XML.-->
<OutputXML type="string" value="$xmlfile1$" verbose="true" />
</JobItem>
</OCRJob>
It contains two sequenced JobItems. The first one is a load/preprocess/locatezones/recognize/export type of job. The second one is the Statistics job, that depends on the first job.
The input comes from $inputfile1$. The recognized text output goes into $outputfile1$ and the stat numbers go into $xmlfile1$.
Your application must change $xxxfilen$ filenames to your actual ones.
IWR.exe Command Line Tool
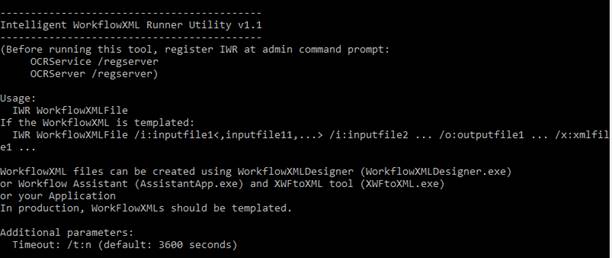
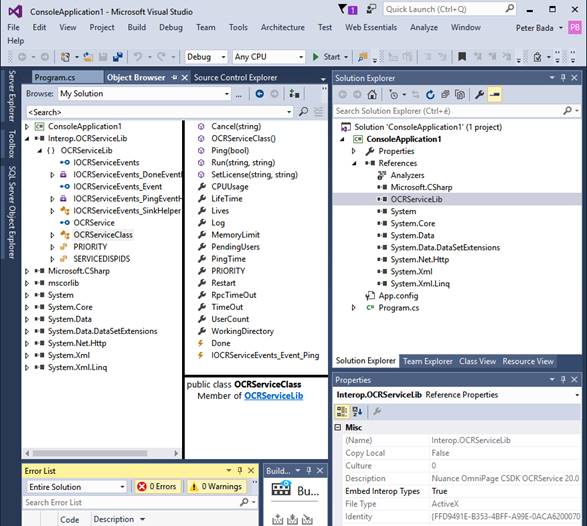
Use this lightweight tool to execute WorkflowXMLs. If you have templated workflow, you can replace the first input and first output file names in 2nd and 3rd parameters. This tool can be used from command prompt or from an application. IWR.exe is a .NET program and it needs Interop.OCRServiceLib.dll to access IWR COM Server. IWR works with default license installed to a physical computer or on Central Licensing Server (No OEM).
IWR.exe is basically a development tool but you can easily implement your own version of it. Its source is located in Nuance\OPCaptureSDK20\Samples\WorkflowRunner\IWR folder.
If you have multiple input files for a workflow, you can also specify them, therefore /i:inputA.tif,inputB.tif means this replacement:
From:
<Inputs type="array">
<Input type="string" value="$inputfile1$" />
</Inputs>
To:
<Inputs type="array">
<Input type="string" value="inputA.tif" />
<Input type="string" value="inputB.tif" />
</Inputs>
Designer Automation API
With this API, you can create WorkflowXMLs programmatically.
IWR Execution API
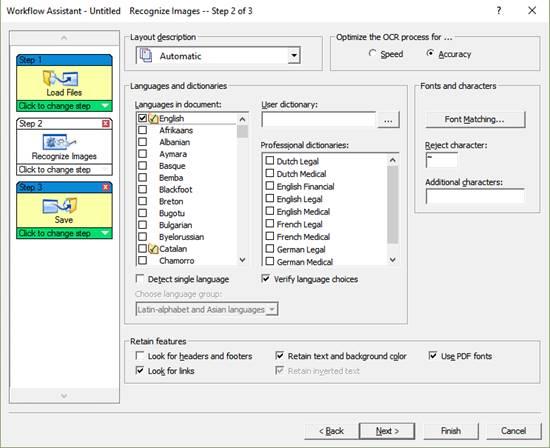
You can use the classic Workflow Assistant (AssistantApp.exe) tool create workflows. It produces old style XWF workflow files. With this tool, you can work the typical OmniPage Workflows way.
An XWF file can be converted to regular WorkflowXML using the XWFtoXML.exe tool:

In this tool, CSDK settings can be changed by specifying a regular CSDK sts file in /s parameter.
Intelligent Workflow Runner
API preview:
void SetLicense(string LicenseFile, string Key)
void Run(string XML, string ID) // Workflows start
void Cancel(string ID)
void Ping(bool Report)
delegate void IOCRServiceEvents_DoneEventHandler(string
ID, int StartError, System.Array StartErrors, System.Array RuntimeErrors,
System.Array RuntimeErrorDescriptions, System.Array ResponseXMLFiles)
delegate void IOCRServiceEvents_PingEventHandler()
int TimeOut { get; set; } // JobXML execution heartbeat timeout. It
is a base value to calculate the real timeout. Basically, it is a heartbeat
period between two progress steps in the workflow engine. In addition, this
period will be increased automatically when the input document has multiple
pages. The period could be much longer when there are 500 pages, to avoid false
hang intervention. Some algorithms tend not to send progress frequently when
there are many pages in the document.
· int CPUUsage { get; set; } // Limit the number of CPU core usage by workers (Affinity). You can leave free cores for CPU-power demanding OCRWorkers. Default: no limitation.
· int UserCount { get; set; } // Number of CSDK worker processes (OCRServer.exe) enabled. Default: Number of virtual CPUs.
· int MemoryLimit { get; set; } // Maximum memory the CSDK process (OCRServer) can use. OCRServer is terminated if its memory allocation goes over this limit. Default: 3GB.
· OCRServiceLib.PRIORITY PRIORITY { get; set; } // OCRServer process priority. Default: Idle.
· int PendingUsers { get; } // Actual WorkflowXML queue length. WorkflowXMLs in progress.
· int Lives { get; set; } // Number of Workflows to be done between two CSDKWorker process restarts. Default: 10.
· bool Log { get; set; } // Turn the log on / off.
· int RpcTimeOut { get; set; } // Out-proc COM API time out.
Using the combination of CPUUsage, UserCount, PRIORITY properties you have all controls over the CPU and memory resource allocation of the IWR. The application can scale the IWR up and down.
Sample Application
Code fragments:
OCRServiceLib.OCRService OCRService;
OCRService = new OCRServiceLib.OCRService();
OCRService.UserCount = number; // Max parallel Workflow execution
OCRService.PRIORITY = OCRServiceLib.PRIORITY.PRIORITY_BELOW_NORMAL;
OCRService.Done += OCRService_Done;
((OCRServiceLib.IOCRServiceEvents_Event)OCRService).Ping += OCRService_HeartBeat;
.
OCRService.Run(xml, ID); // async call to the OCRService
.
void OCRService_Done(string _ID, int StartError, Array StartErrors, Array RuntimeErrors, Array RuntimeErrorDescriptions, Array ResponseXMLFiles)
{
}
void OCRService_HeartBeat()
{
}
See Sample Workflow projects in the bin/bin64 folders of the CSDK installation path.
Start WorkflowXMLDesigner.exe.
Select File / Open…
Study and run the workflow, check the outputs.
User written custom JobItems
Creating custom job item (C#):
1. Create a new C# project with 'Class Library' template. Set Target framework to '.NET Framework 4.6'.
2. With Configuration Manager, create new solution platform; 'x86' or 'x64' depending on your deployed CSDK.
3. Add Nuance.OmniPageSDK.IproPlus.JobItem.dll and Nuance.OmniPageSDK.IproPlus.dll as reference.
4. Use Nuance.OmniPage.CSDK.IproPlus namespace.
5. Derive your class from JobItem and implement abstract class.
6. You can find an implementation of Ping and GetResult methods in CustomJobItemCS sample.
7.
Implement Run method as you wish. You can evaluate your job request
accessing XElement public
property.
You can access IproPlus Engine and Document via public properties, do not
dispose them.
Fire a Progress event periodically.
If you have a lot of work to do, fire NewObject event occasionally.
When your task is finished, fire the Done event.
8. Make your class COM visible via adding attributes ComVisible(true), Guid(""), ClassInterface(ClassInterfaceType.None).
9. Implement a static Register function to change COM threading model to apartment model. You can find a sample in CustomJobItemCS sample.
10. Unload project and edit it to add a platform specific post build event.
<PropertyGroup
Condition="'$(Platform)' == 'x86'">
<PostBuildEvent>
call "$(DevEnvDir)..\..\vc\bin\vcvars32.bat"
regasm "$(TargetPath)" /codebase
</PostBuildEvent>
</PropertyGroup>
<PropertyGroup Condition="'$(Platform)' == 'x64'">
<PostBuildEvent>
call "$(DevEnvDir)..\..\vc\bin\amd64\vcvars64.bat"
regasm "$(TargetPath)" /codebase
</PostBuildEvent>
</PropertyGroup>
Do not use Register for COM interop
option.
11. Build your project.
Integrating into WorkflowXMLDesigner:
1. Create a new C# Class Library project targeting to .NET Framework 4.6 or use the project containing your JobItem.
2. Add System.Activities.dll and Nuance.OmniPageSDK.IproPlus.JobDesign.dll as reference.
3. Add a new class, use Nuance.OmniPage.CSDK.IproPlus.JobDesign namespace and derive your class from JobItem.
4. In constructor, set CLSID field to {<YOURGUID>}.
5. Add necessary public properties to your class, these will be edited in WorkflowXMLDesigner.
6. Override CacheMetadata method to check your properties and add validation error if necessary.
7. Override InputXMLContainer property to compose a proper XML snippet, it will be passed to your custom job item.
8. If you want a custom UI, you can implement an ActivityDesigner class and add Designer attribute to your class.
9. Build your project.
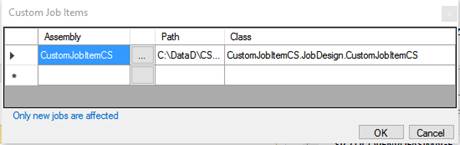
10. In WorkflowXMLDesigner select Options/Custom Job Items... and add your assembly to the collection.
Debugging your custom job item designer
1. Simply set WorkflowXMLDesigner as external program to start debugging.
2. Check composed XML.
Debugging your custom job item
1. In Task Manager terminate all OCRServer.exe instances.
2. Set OCRServer.exe to the external program to start debugging.
3. Start debugging.
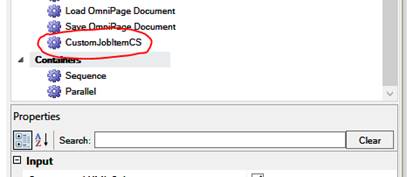
4. Launch WorkflowXMLDesigner, create a job using your custom job item, and run the job.
Custom JobItems must also be registered in the Designer: Options/Custom Job Item… menu.