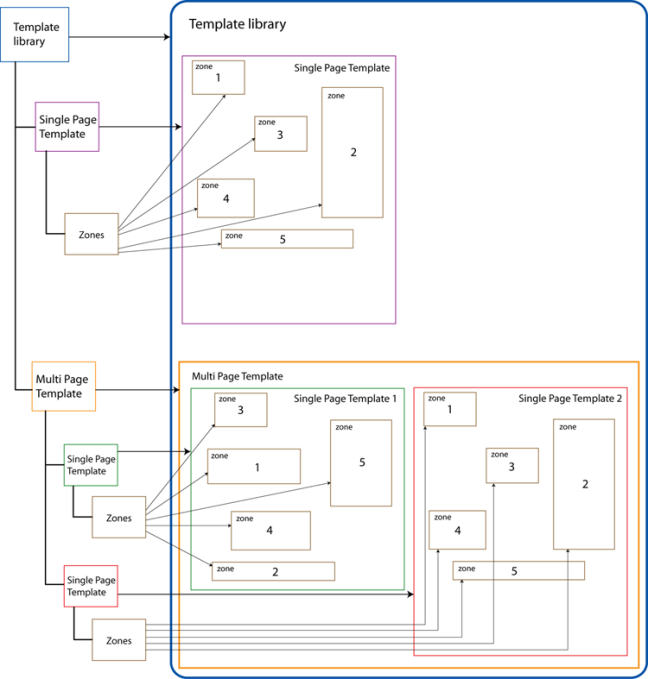
A library is a collection of template files used for form processing (Figure 1).
Figure 1 Template library structure
A template is a single-page image of an unfilled form (PDF or other) on which you can define zones for processing. Your form page image and its zones together constitute a single-page template.
The appropriate template for each scanned image is selected automatically during form processing. Template selection happens with the help of selector, positional and reference anchors.
The selected template is matched on the actual image. The image and/or the zones are deskewed, shifted, enlarged or compressed to match one another. This is also called form registration. Template matching happens with the help of reference anchors.
A multi-page template is a container folder for templates. Use this to represent a multi-page form: after you have created the multi-page template, add template pages one by one.
Use multi-page templates for processing multi-page forms.
A zone is a rectangular area on the form page defined during template creation.
Based on the purpose and properties of the zone there are two basic groups offered in Form Template Editor:


It is either a field that you can fill in or a comb. It can also be a checkbox and can contain barcode as well.
Anchor zones are defined by their types and content. Types define what their function is in form recognition and template creation. Content determines what the actual information sought is.
Each anchor zone has a reference point. The reference point can be:
The reference point is more relevant if the text length can vary (with regular expressions).
Template selection and template matching happens via anchor zones.
There are four anchor types in Form Template Editor both for text and barcode.
Selector anchors do not have role in form alignment and positioning; they are used only for selecting the template (whether the template matches the document or not). It is a template-level operation.
It is not mandatory to define selector anchors; template selection can also be based on positional and/or reference anchors.
Selector anchors should be used to match templates on pages. You need to find a piece of text on the page that is specific only to that particular page (in a certain area of the page).
You can define more than one selectors on the page, if needed or if it increases confidence.
Use these anchor zones to align all fill zones on the page or to select the template. Since images can get distorted (especially digital camera pictures of documents taken from a steep angle) using four of such anchors is recommended. It is advised to place positional anchors close to the four corners of the page. It is a page-level operation. It is not mandatory to define positional anchors, but otherwise it is useful to define a reference anchor for every fill zone. Linear distortions (skews, shifts, zoom-ins, zoom-outs) can be corrected with positional anchors. Diverse distortions may appear on the pages to be processed (e.g. page slips when printing or scanning, images taken by digital cameras, etc.). In these cases it is recommended to define reference anchors.
Note:
Both positional and selector anchors have a built-in tolerance when the recognized text is matched to the template field text (the tolerance is a built-in algorithm, based on the length of the text and on other factors). This means for example that texts that differ in a single character are not appropriate for a selector anchor, because it can happen that the CSDK engine accepts it as matching, since one character difference is allowed. This type of tolerance is there to allow the false rejection of pages when there is a recognition error (as there can always be minor recognition errors, especially when there is a short text). Hence the longer (several words) the text you can use for a selector anchor and the clearer the text (e.g. upper case texts), the better the confidence.
Use reference anchors (or reference zones) to more precisely align the fill zones on the page. It is always preceded by the positional anchor alignment. It is possible to define a different reference anchor to each and every fill zone. The position of the fill zone is determined based on the position of the reference anchor assigned to it. It is not mandatory to define reference anchors. If a zone does not have reference anchors then it is moved to the position calculated based on the positional anchors. Reference anchors must be used when we want to define a fill zone whose position on a page can change, but there is some fixed text on the page in a relatively same position to the zone. It is recommended to choose the static text positioned before/above the zone as a reference anchor. Usually, one reference anchor needs to be defined for one zone.
If the X and Y position of the moving zone can be better defined by two reference anchors, then after adding the first anchor (Create), the second one should be linked to the left and right side of the fill zone as well.
If the size of the zone can change (e.g. hight), also two reference anchors are necessary. The first one should be added to the fill zone by Create option on the References pane, the second one should be linked to the bottom of the fill zone. This way the first one defines the place of the fill zone, while the second one defines the position of its bottom, or height in this case.
Altogether four anchor zones can be linked to a single fill zone, one to each side, though it might rarely have any practical use.
If you find that an anchor zone (A1) is not linked to the proper position of the fill zone, simply re-link it to the proper anchor zone (A2) using the Left, Top, Right or Bottom options on the References pane of the Home tab; This way anchor zone (A1) gets disconnected from the fill zone. These buttons do not have a toggle function.
Check anchors are used for checking the form alignment. Check anchors are not used during template selection and matching. Their positions are determined in the same way, as that of the fill zones. After positioning, their content is checked and if it does not match the given content, matching fails.
A template library can only contain text and barcode type anchors.
The anchor contains static text. It is word based with a bounding box (can be LETTER based for backward compatibility). It can only contain one-line text. It is recommended to choose anchors that consist of 2-3 words. Try to choose text not resembling any nearby text (e.g. Drift area). It may contain fixed text or regular expression filter. Text can be positional, reference, selector and check anchor.
The anchor contains static barcode. The barcode type must be specified. It may contain fixed text or regular expression filter. Barcode can be positional, reference, selector and check anchor.
In the case of text and barcode anchors the regular expression filter works the following way:
The anchor is found if the Levenshtein distance (minimum number of single-character edits - insertion, deletion, substitution - required to change one word into the other) of the recognized text and the anchor text is less than a given threshold. This is not a fixed threshold: it is proportional to the number of characters in the anchor.
The anchor is found if the recognized text matches the regular expression.
Text anchor zones have the following colors according to their types. The icons used in the application are shown next to the color description.


Barcode anchor zones have the following colors according to their types. The icons used in the application are shown next to the color description.


It is a fill zone whose filling method is Barcode. To ensure successful barcode recognition you need to define the correct Barcode Type in the zone properties window.
It is a fill zone whose filling method is optical mark.
It is a fill zone whose filling method is optical mark.
It is a fill zone whose filling method is optical mark.
The drift area specifies the environment where the anchor is searched. If the template file does not contain the drift area, the default value (setting) is used.
The drift area has X and Y values and it can be infinite. Its color is a semi-transparent version of the zone color.
The zone property grid displays a different set of information for the anchor zones and the fill zones. It also has separate information set on the Template Library itself (Figure 2)
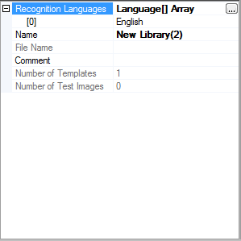
Figure 2 Template Library property grid
Expand the Recognition Languages list to reveal the library-specific recognition languages.
Click in the Language[] Array field to display a three-dot button as a trigger for the Language Collection Editor window (Figure 3).
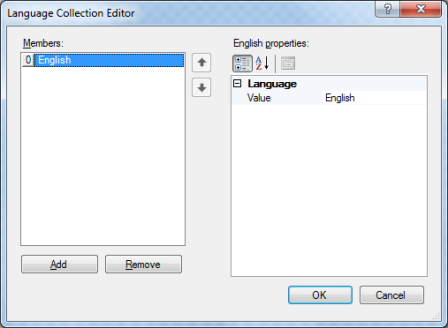
Figure 3 Language Collection Editor window
Click the Add button to add a new recognition language (always English by default) whose properties you can edit by clicking in the Value field; a dropdown arrow appears next to the language name (English). Click the dropdown arrow to display a list of available recognition languages. The language you set is immediately displayed in the Members list, with an ID number incremented by one (Figure 4).
Note:
Always set the recognition language on the template library to the languages / character sets you will use, otherwise matching errors can occur. You can set the template library recognition language on the Template Library property grid (see Figure 2).
Note:
CCJK, Thai and Arabic languages are not supported.
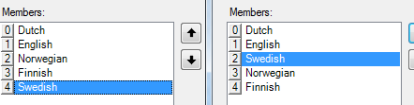
Figure 4 User defined recognition language list showing changed language position (Swedish)
Use the Up-Down pointing arrows (Figure 4) to change the position of individual languages in the list. In this case, the language identification number automatically changes to reflect the actual position in the list.
The language properties can be viewed in two different ways (Figure 5):

Figure 5 Language property viewing options
Figure 6 displays the anchor zone property grid.
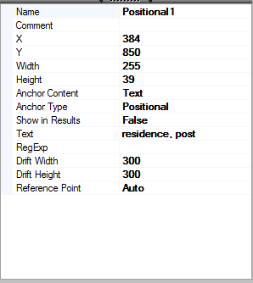
Figure 6 Zone property grid for the anchor zones
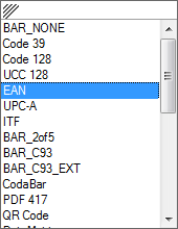
Figure 7 Scrollable barcode list
Auto is set by default.
Figure 8 displays the fill zone property grid: fill text zones, fillable barcode zones, checkbox zones, dropout color picker areas and combs (each labeled according to its type in the application).
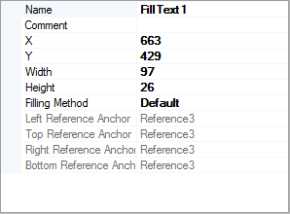
Figure 8 Zone property grid for the fill zones
New optional zone attribute: index of the reference zone(s). The current zone is anchored to the specified reference zone(s).
The following five reading orders are supported:
The application examines the zones' X, Y coordinates and compares the values to the left page margin, progressing in a traditional left-to-right direction and assigns the highest priority to the zone closer to the left margin.

Figure 9 Left to Right reading order
The application examines the zones' X, Y coordinates and compares the values to the top page margin, progressing in a top-to-bottom direction and assigns the highest priority to the zone closer to the top margin.

Figure 10 Top to Bottom reading order
The application examines the zones' X, Y coordinates and compares the values to the top page margin, progressing in a row-by-row direction and assigns the highest priority to the zone closer to the top margin.
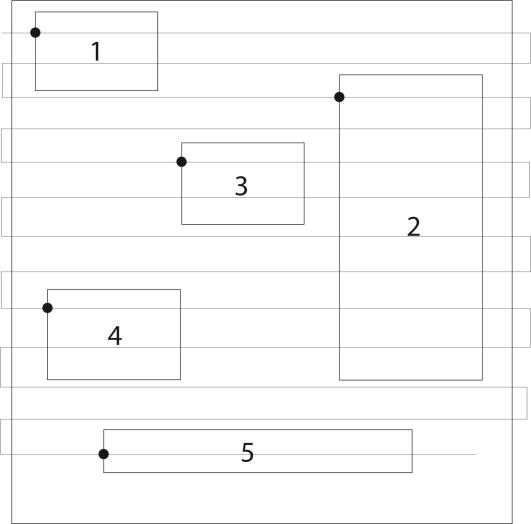
Figure 11 By Rows reading order
The application examines the zones' X, Y coordinates and compares the values to the left page margin, progressing in a column-by-column direction and assigns the highest priority to the zone closer to the left margin.
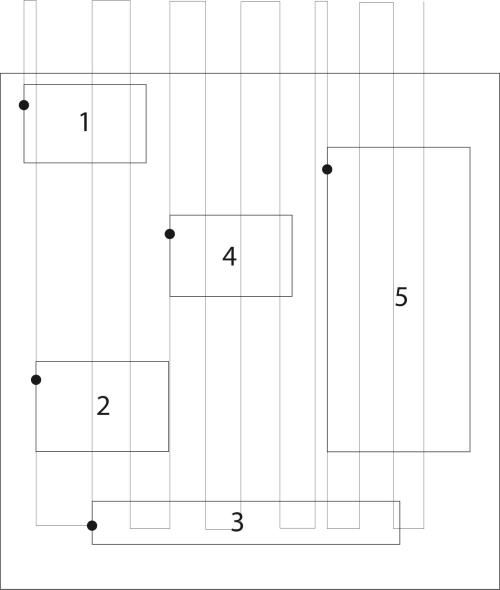
Figure 12 By Columns reading order
This setting reverses any of the already set reading orders.
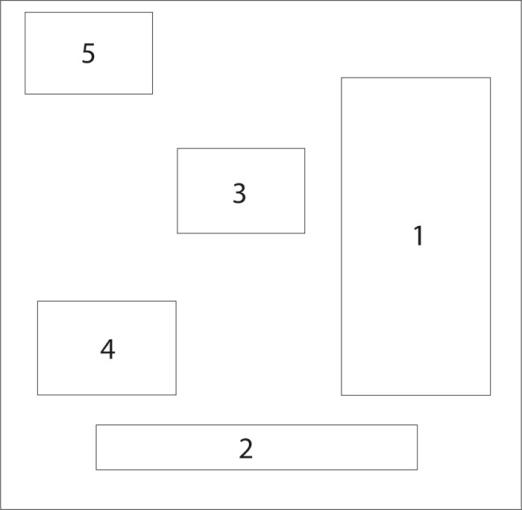
Figure 13 Left to Right reading order reversed
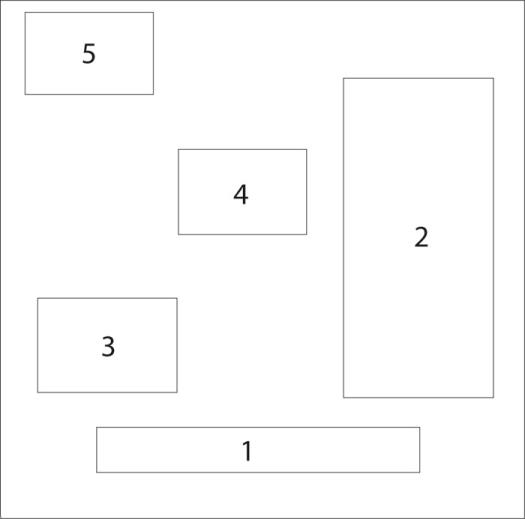
Figure 14 Top to Bottom reading order reversed
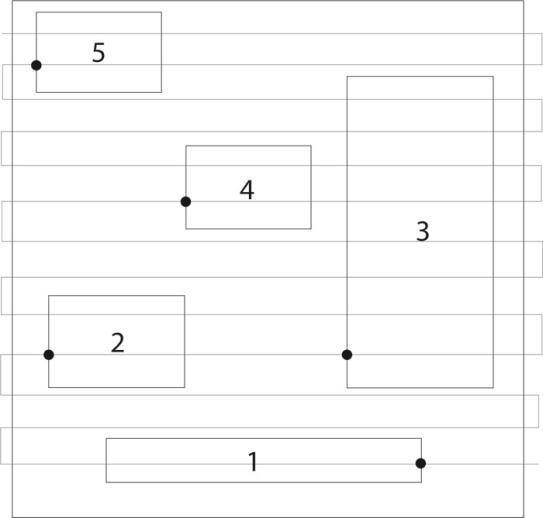
Figure 15 By Rows reading order reversed
Figure 16 By Columns reading order reversed